The Admin Transformer
Thomas Lindsey Freeman
CMPS 161 UCSC Winter 2011 Quarter


Instructions
You will need the QT SDK to compile/run this program. For detailed control info (since there are multiple debug modes), please see the readme file linked on this page.About this Project
Abstract
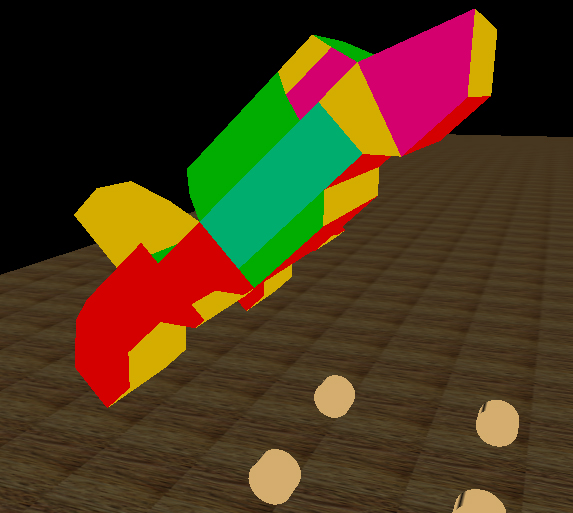
Animated models in OpenGL using in-system generated geometry is a tricky subject area, and this project shows off a vehicle that can change into different forms that makes use of a custom built keyframe system made for OpenGL model objects that had to be developed for the project.Introduction
There has always been a fascination with objects that transform their shape to become something else/perform another function, with TV shows such as Transformers and Power Ranger’s Megazords capitalizing on this desire. For my final project in CMPS 161 I decided to create a vehicle that could shift into either a mechanized walker or a hovercraft airplane, taking inspiration from a wide swath of movies and games such as Back to the Future, Spy Hunter, and the afore mentioned Power Rangers and Transformers TV series and movies. As I discovered over time however, this idea while simple on paper turned out to be a difficult task to accomplish, requiring a custom animation system to make the morphing between vehicle modes possible. This paper will discuss that system I came up with the hurdles I faced.Background
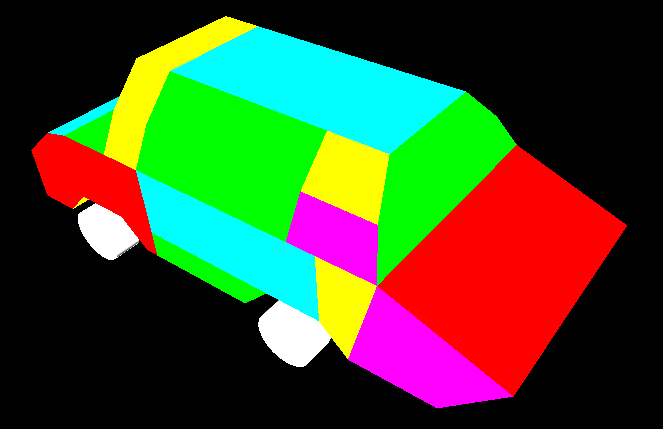
OpenGL combined with the QT SDK was used for this project, which allowed me considerable freedom in deciding how to go about implementing the vehicle to be animated. Originally since there were several complex animations that needed to be mapped out and scripted, I was intending on using an open source toolset called Cal3D to import the vehicle model but after blueprinting out the design I decided instead to create the model by hand (using self calculated point data) in OpenGL. This decision was brought about by several hurdles I foresaw coming about; 1. The model was simplistic enough that it would be a waste of time and effort to create it in a traditional program such as Blender or 3DS Max and then export/import into OpenGL. 2. The actual import process is complicated by the lack of code bases that could both bring a model and its associated animations and skeleton into OpenGL (and in some cases out of my technical expertise) In the end I decided on a three part design for the main body of the vehicle, consisting of a head and torso that could rotate together on a “hinge” and the legs which would appear as the trunk area of a car but would split apart to become legs or wings depending on the vehicle mode being changed to.Method
After tediously modeling out the car, I placed each part in a display list, ensuring fast redraw times due to the lack of needing to create and draw each quad polygon anew each refresh tick. I then created a series of draw functions for the various body parts and grouped them together. This permitted me to apply whatever translations/rotations I wished to each part separately while at the same time keeping the entire vehicle enclosed within a body structure boundary. With the modeling completed I turned my attention to the issue of how to animate the model. Since animation was the biggest part of my project I had to find a way to modify the parts of the vehicle to match the complex animations I storyboarded out. In previous projects keyboard input was used to great success to increase the position/rotation of OpenGL objects to great success, however such a method was not feasible in this case as the model had to handle static operations in sequential succession. Since importing a model with intact animations was a method I deemed too complicated (and seemly impossible after days of researching), I was forced to design and create my own keyframe animation system from scratch. The custom keyframe system I came up with takes in translation, rotation, and velocity vectors in three dimensions along with an angle for the rotations. In addition to these variables, a bodypart ID is passed in that ensures the keyframe’s passing of OpenGL commands is done on the right bodypart draw function (avoiding cases such as wishing to have the head turn 90 degress but having it applied to every body part as well). This was accomplished by running a check of the animation state function before the redraw of a bodypart display list. At a keyframe’s creation, the passed variables get set as maximum values with a current variable set up opposite of each one. These current variables are incremented/decremented with each program tick update, ensuring smooth transforms from start to end point. Careful pushing and popping of transformation matrices had to be done to ensure the last keyframe’s coordinates would be taken into account and not forgotten when a new keyframe was activated and used. This involved running through a loop of already expired keyframes in the check animation state function and applying each translation and rotation operation of these frames onto the respective bodypart passed in as a variable into the function. After this the current frame would be updated and any transformation applied on top of the expired frames position/rotations. Without this step the animation for each frame would play out then snap the bodypart back to its default position before the next keyframe due to the resetting of the transforming matrix. Modifying the origin of the car’s body and its various parts was another necessity for the project as many of the animations involve flipping or hinging parts. To this end I made a function that takes in a new origin position and applies it before drawing the various body parts. This is useful when for example in the car to walker animation the body has to rise up and rotate itself onto the trunk. In this case the back wheels need to be the source of the origin for the rotation which necessitates the moving of the body origin from the bottom of the vehicle to the location of the wheels. Since applying storyboarded animations on paper to actual models is often not a smooth transition, I also created an animation debugging system that allows user inputted keyframe points to any bodypart of their choosing. The system is toggled with a specific key press and then separate modes for translation, rotation can be activated. Once one of these modes have been turned on then the X, Y, Z axis’s can be enabled and increased/decreased. The states of all the variables are displayed with each modification, allowing the user to note down the variables for later input into a static keyframe to have animated out automatically. A similar debugging system was created for the camera, allowing the user to find and note down the various position/view variables in order to place the camera in a “chase” location behind the vehicle. With the camera debug mode the user could adjust the X, Y, Z axis and the tilt/angle of the camera. Since we are heavily encouraged to use and show off as much animation as possible in the project, I created a function that swings the camera around the model during a transformation to show off the morphing in all its glory. This is done by incrementing the angle each frame tick any of the “currently in transformation” Boolean values is triggered. Getting a perfect 360 degree rotation is not necessary as the rotation matrices are destroyed and the camera reverted to its original chase position as soon as the respective boolean values are set back to false. Since locking the camera to the vehicle and keeping it in the same position as the vehicle moves proved to be difficult I decided instead on making the vehicle and camera stationary and instead translate/rotate the terrain via the vehicle input controls instead. This insures the camera is always in the perfect chase position.Result
While the project originally started out as a sandbox game where the user could control a vehicle around the terrain, it quickly changed into a necessity of having the ability to keyframe objects in OpenGL without the need to have complicated third party plugin programs. Time was a major factor for this project and if I had had more of it I would have been able to go further with the actual vehicle manipulation and environment implementation. As it stands now I have a relatively robust keyframe system that can be easily adapted to other projects I undertake that require animation. The project was not without difficulties, I originally intended to have the vehicle be in the midst of heightmap generated terrain that could be collided with, as well have influence on the various parts of the body (such as feet that could be shifted based on the terrain height or position) as well as having the model be completely modeled out in a traditional 3D modeling program package. The time I put into researching alternate ways to accomplish my goals was significant and it wasn’t until the last few weeks of the quarter that I was able to make substantial progress. I was hoping to also make it so multiple keyframes could be executed at the same time but due to logic and time issues I was forced to abandon the feature. Much time was also lost on the keyframe system, mostly to do with calculation/interpretation issues as well as debugging/testing. Early on in the system’s development I dropped support for scaling of objects as it was hard to lock down an anchor point for the object to stick to while resizing. Negative numbers were also a big issue for a long time, refusing to expire keyframes when the goal distance or rotation was met. This was eventually discovered to be due to an issue with the datatype used to store the variables as well as a logic problem with the three axis. This was corrected by making separate cases for each axis and checkpoints that had to be all activated before a keyframe could consider itself expired and inactive.Related work
Most of the information and work I’ve found on keyframe systems has mostly been with interpreting and integrating animations made in modeling programs outside of OpenGL. These solutions are often large open source subset code databases that are difficult for the average user to integrate into their projects, more suited toward games that require vast numbers of models and intact animations. The more simple systems often only import the geometry data and not the animation data.Future Work
Currently the animation keyframe system is still in the fine tuning phase of development. For future projects I hope to make it so multiple keyframes can be executed at once and keyframe delays can be used to hold an animation at a point for a certain number of frames. I also hope to make a more substantial version of my transforming vehicle game once this keyframe system has been perfected, as I have high desire to make a game that challenges players on multiple levels of environment and controllability.Conclusion
Animated morphing with restricted movement of parts is something that has been made easy with traditional 3D modeling program’s use of keyframe and skeleton systems. While my method of overcoming OpenGL’s lack of such systems is perhaps not the most elegant, it nevertheless was a easier task to implement for animated sequences then using a larger program more suited for larger, complicated programs, and is a system I hope to improve upon in the near future.References
Cal3D: http://gna.org/projects/cal3d/OpenGL:Tutorials:Basic Bones System: http://gpwiki.org/index.php/OpenGL:Tutorials:Basic_Bones_System
Key Frame Animation: intranet.cs.man.ac.uk/Intranet_subweb/library/3yrep/.../5724217.pdf