Joshua Jacobson, CMPS 161 – Winter 2011
Wiimote Visualization through a Particle Field
Description
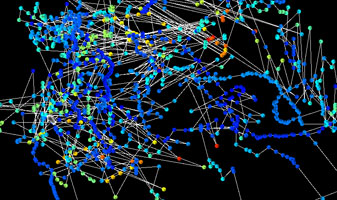
For this project I visualized the input data that is given from the Wiimote, primarily the IR camera data and the accelerometers. Using this data I put together flows of particles along the paths specified by the user along with the user being able to modify the data using input from the accelerometer.
Details
What I did for this project was gather a bunch of data from the Wiimote. This data mainly included the IR camera data and the accelerometer data. Each of these points contained four different pieces of data: x, y, and z coordinates, and the angle of rotation of the Wiimote at that point. This data is then used to create Catmull-Rom curves along paths which the Wiimote moved. After this, I take particles and have them crawl the path. These particles are given a small shift to their initial positions because it ended up looking more aesthetically pleasing. Each of these particles is then rotated such that the arrow on them is mapped to the rotation component and the color of them is mapped to their place on the z axis. There is also an additional mode in which the user can track multiple points over time. After paths have been placed the user can use the accelerometer data in the Wiimote to shift these curves around.


User Guide
The program is written in c# using the Xna libraries and so they are required in order to run the program. In addition to run the code it is required to have a Wiimote, Bluetooth connections on your computer, and some method of emitting two stationary points of IR light.
Steps
- Connect the Wiimote to your computer by opening up the Bluetooth device panel, selecting add a device, and then pressing the 1 and 2 buttons on the Wiimote simultaneously. The device should appear on the list, connect to it, and then select pair without using a code.
- Run the source code.
Modes
There are two modes within the program. The first is the single curve mode and the second is the multi curve mode. In the single curve mode the user has the option of either creating a curve with the IR camera input or using the accelerometer to create the curve. In multi curve mode, a curve is created from each IR point that is seen. Whenever a point is no longer being tracked, it resets the data and starts a new curve. All curves can be drawn while holding the A button. The modes can be switched with the 1 and 2 buttons.
Additionally, the accelerometer is used to push the curves in different directions. This is done by holding the B button and either fanning off-screen or it just reacting to all of the accelerometer data. The modes between these can be switched by pressing the – button.
Buttons
-1: put it in single curve mode
-2: put it in multi curve mode
-A: draw curve
-B: shift curve with accelerometer data
- +: reset curve’s shifted position
- -: change the method of fanning the curve
- Right: put it IR data mode for curve path
- Left: put it in accelerometer data mode for curve path