Death Kart 3D
by Mike Keller
Death Kart was intended to be a 3D Go-Kart game. I basically wanted to make a Super Mario Kart (for SNES) kind of game in 3D. I couldn't find a good Go-Kart model to use, but I found this sweet Batmobile, so I used that instead. Rad.
In the game, you race around the track with some simple controls. Don't bump into the walls because they're really slow you down. If you're not doing so well, you can always turn on the super sweet pump-up music, courtesy of Iron Maiden.
Left/Right Arrow Keys: Turn Left or Right.
W Key: Gas
S Key: Brake
R Key: Reverse- use this if you hit a wall head-on.
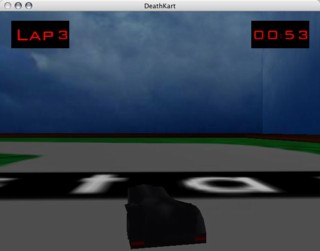
D Key: Toggle the HUD (the timer and lap counter on the top).
M Key: Toggle super sweet pump-up music (Aces High by Iron Maiden).
F Key: Toggle wireframe mode (Why? Why not?)
L Key: Toggle collision lines around car.
C Key: Toggle collision detection.
ESC Key: Quit the program.

Tail lights work when you brake.

You can toggle the HUD if it's distracting.

Wireframe mode is silly.
note: for some reason when I ran Snapz Pro to capture the movie, it made steering less responsive in the game, so that's why it looks so 'floaty'.
Creating DeathKart 3D was no simple task. It included a lot of different graphics techniques acquired throughout 160 and 161, as well as a bunch of Math and a splash of Physics. Also, since I decided I wanted to include sound, I had to include and learn how to use a sound library. I broke the project into 7 stages:

-I found this really cool Batmobile model at 3dcafe.com. Only problem was I had no idea how to use it in GL. Turns out, it's not that hard to make a 3DS model loader. I basically followed the tutorial on spacesimulator.net, so I can't say I would have been able to figure it out on my own, but it basically involves ripping out the correct bits, converting the endianness of the data (since I did this on a Mac), storing the vertex and polygon data in an array of data structures, and then drawing it using familiar glVertex commands.
-One issue I did have with this was the tutorial doesn't include 3DS color mapping, only reading bitmpap textures, so I had to draw the tail lights on my own. This worked out for the best though, as I was able to control their brightness for the cool lighting up effect when you brake.

-The next stage was to put the car into the perspective I wanted and to draw a temporary world to drive around on. Because the Batmobile model was turned sideways and I don't have 3DS so I couldn't change that, I had to adjust the starting rotation in the X direction to -90 degrees. Also, To get the third person perspective, I translated -200 in the Y direction and -750 in the Z.
-The temporary world consisted of 4 walls with sky textures on them and since I hadn't designed the level yet, I used a picture of some crappy drawing I had sitting on my desktop for the surface texture (see the blue binder paper line in the screenshot?).

-In order to get smooth rotation of the car, rather than having an arrrow key directly adjust the angle of rotation in the X direction, I had it adjust a rotation increment value. So the increment value would go up the longer you held the arrow key, and in every frame, the rotation value would be added to the current increment value.
-I also wanted it so if you held the arrow key for a long period of time, it would turn at the maximum angle (25 degrees), but if you just tapped it, the car would just adjust a little. To do this, I had to add an idle counter that would reset when you hit an arrow key. If the counter reached a certain value without being reset, I knew the player hadn't hit a key recently, so I could return the car to it's forward facing rotation before reaching the maximum angle.
-Being able to actually drive the around the level was a little tricky. Because I
wanted the car to remain in the same place in the viewer, I had to translate the entire
level around as you drive. To determine how much to translate I did some Math- here's
a code snippet, since it's easier than explaining:
theta = degToRad(trackRot);
Cx = sin(theta);
Cx *= speed;
Cy = cos(theta);
Cy *= speed;
Tx = posX - Cx;
Ty = posY - Cy;
glTranslatef(Tx, Ty, 0.0f);
posX = Tx;
posY = Ty;
-The above code worked well enough for driving forward (in the positive Y axis), but I quickly discovered that it would have to be adjusted for each direction. So for example, if you were driving along the X axis, you would have to add Cx and Cy to Tx and Ty rather than subtracting.

-Consider it an homage to the game I was inspired by, or a lack of creativity, but I decided that I would copy the first level of Super Mario Kart for my map. I hand-drew out a sketch of the map including the placement of the walls, painted it in Photoshop, then proceeded the painstaking process of getting the walls drawn in the correct place (using a highly technical method called trial and error). Here's my original sketch:

-After I got the walls into place, I wanted to texture and light them. The normals were really easy since they are all in an axis direction. The texture I used was a stucco wall texture, but when it was stretched out it looked like woodgrain, so I just colored it darker to go with that.

-This was undoubtedly the hardest part of the program. So since I made the design choice of handling the driving as going in 4 directions (forward, backward, left, and right), I had to handle collision this way too. But first, I had to figure out where the corners of the car were. If you press the 'L' key you can see my collision lines that I used for this stage.
-Once I knew where the boundaries of the car were, I had to loop through the data structure storing the position of all the walls, and compare that to the position of the car's corners.
-One tricky thing was that I wanted the car to stop completely if it hits a wall head-on but to just bounce off and slow down if it hits it at a sufficient angle. So I had the collision function return what the orientation of the wall was (along X or along Y).
-Handling a head on collision was easy: if you're going in the forward direction, and
the wall is in the X direction, the speed of the car is just set to 0. But if you're going
in the forward direction and the wall is in the Y direction, you have to bounce off. Here's
a code snippet:
if (trackRot > 0) {
trackRot = -0.5*trackRot;
rotation_z_increment = speed*speed;
posX += 20;
} else {
trackRot = -0.5*trackRot;
rotation_z_increment = speed*speed*-1.0f;
posX -= 20;
}
speed = 0.8*speed;
-Things to notice: The reason I set the rotation_z_increment to the square of speed was just that it looked better for the car to bounce off at a faster rate the faster it collided. Also, I had to adjust the position of the car when it hit (by 20), otherwise it would get stuck in the wall while it kept detecting collisions.
-There are two main things about the game itself: The number of laps completed and the elapsed time.
-To increment the laps, I first determined where the starting line was. Then I incremented a counter if the position of the car was in between the boundaries of it. Two original problem I had with this are that it would count multiple laps if you were going slow. Also, if you were to turn around and cross the line again you could cheat. To alleviate both these prblems I also set an invisible checkpoint halfway around the track. So in order to complete a full lap, the player would have to cross both checkpoints.
-The timer was simple enough. Using the standard ctime library, I got the elapsed time by storing the starting time in the initialization function, then at every frame, getting the current time and finding the difference. One shortcoming is that there is no easy way to get milliseconds out of ctime, but for my purpose I decided seconds were sufficient.
-Finishing touches included drawing the HUD (Heads-Up-Display; the lap number and elapsed time counter), implementing sound, and touching up the textures.
-I couldn't think of any other way to do it, so I made the HUD by actually drawing polygons on the top of the screen and adjusting textures for the information being displayed. So, I had to make 10 textures for the digits and depending on how seconds had elapsed, I would calculate each digit and bind the correct texture to that spot on the polygon.
-For the sound effects and music, I used the free audio API, OpenAL. Setting it up was confusing at first, but I got it thanks to this tutorial. After the initializations and loading all the sound files into memory, it is just a matter of playing and stopping sounds at the correct times with the functions: alSourcePlay("source.wav") and alSourceStop(source.wav), respectively.
-For the engine noise, I combined two loops: a 4 cyclinder and 8 cylinder engine sounds,
which I ripped out of a real game I had on my computer. I was able to adjust the pitch of the
sound using the following code:
currPitch = (speed+6.0f)/(MAXSPEED);
if (currPitch < 0.5f) currPitch = 0.5f;
alSourcef(source[0], AL_PITCH, currPitch);
Thanks to the people that voted for me. The backpack is lovely.